Creating Your Own Cryptocurrency In 10 Simple Steps
Learn how to create your own cryptocurrency in 10 simple steps. Create a smart contract and deploy it to the blockchain within minutes!

Here's the step-by-step workshop that I gave at the Bushwick Generator for the first-annual Brooklyn Tech Week. You'll learn how to create your own cryptocurrency and deploy it to the Ethereum blockchain within minutes.
Grab the source code here ⬅️🔥
Step 1. Setup MetaMask 🎭
MetaMask injects the Web3.js library directly into the webpages within your web browser. For the sake of this tutorial we will be using Google Chrome.
In order to follow along, please download it if you do not have it already.
- Install the MetaMask Chrome extension
- Create an account
- Save your seed phrase
- Verify your account
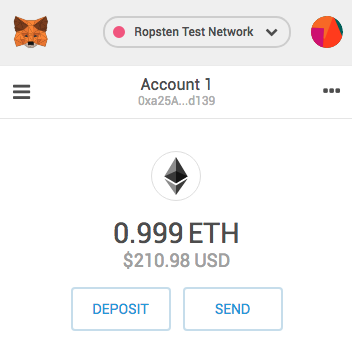
Step 2. Select the 'Ropsten Test Network' ⌨️
Click on the MetaMask fox in your Chrome extensions area towards the top right of your browser.
From within the MetaMask switch from the 'Main Ethereum Network' to the 'Ropsten Test Network'.
Ropsten is a way for developers to utilize and test blockchain technology without actually needing to purchase real Ethereum.
Step 3. Request Test Ether 💸
Next we'll need to request some test Ether so we don't need to deploy anything with real money while we're still in development.
we can get this test ether from various different 'ether faucets'. In our case, let's use the MetaMask Ropsten Faucet
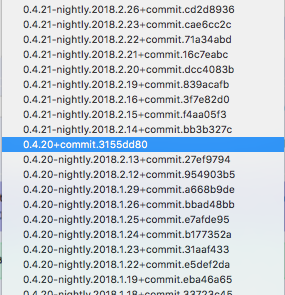
4. Open Up the Remix IDE 💻
Remix is an awesome tool that allows you to write Solidity smart contracts straight from your browser. It's an incredibly powerful way to rapidly develop and debug your smart contracts.
Use this link: http://remix.ethereum.org ⬅️
For this example we need to set the Solidity compiler to version 0.4.20+commit.3155dd80

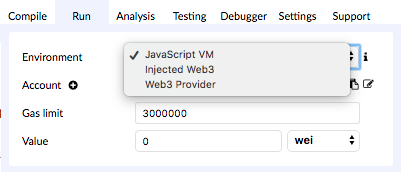
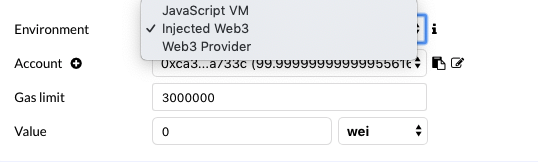
5. Specifying Our Remix Development Environment 🌴
Remix allows us to develop our smart contracts within a few different Ethereum environments.
- JavaScript VM
- Injected Web3 (Requires MetaMask, Mist, etc...)
- Web3 Provider (Requires an Ethereum Node)
While we are initially testing our smart contracts, we'll be using the JavaScript VM environment, so be sure to switch over to that if you're not already there.
6. Writing Our Smart Contract 📝
Create the framework of our contract
First, in our smart contract we need to specify the solidity compiler version.
In our case, we are going to use version 0.4.20 just as we specified within Remix.
Then we will create the smart contract wrapper itself.
pragma solidity ^0.4.20;

contract BrooklynToken {

}
Initialize Variables
Next we need to initialize our variables for the contract owner, token name, token symbol. From there we will create an array that stores the addresses of all token holders.
pragma solidity ^0.4.20;

contract BrooklynToken {

// Set the contract owner
    address public owner = msg.sender;

    // Initialize tokenName
    string public tokenName;

    // Initialize tokenSymbol
    string public tokenSymbol;

    // Create an array with all balances
    mapping (address => uint256) public balanceOf;

}
Create the Function That Will Deploy Our Smart Contract
Next we need to create a function that will accept the arguments initialSupply which sets the initial amount of tokens to be created and then gives all of the tokens to the contract creator, _tokenName which sets the value of tokenName, and _tokenSymbol which sets the value of _tokenSymbol.
pragma solidity ^0.4.20;

contract BrooklynToken {

// Set the contract owner
    address public owner = msg.sender;

    // Initialize tokenName
    string public tokenName;

    // Initialize tokenSymbol
    string public tokenSymbol;

    // Create an array with all balances
    mapping (address => uint256) public balanceOf;

    // Initializes contract with initial supply tokens to the creator of the contract
    function BrooklynToken(uint256 initialSupply, string _tokenName, string _tokenSymbol) public {

        // Give the initial supply to the contract owner
        balanceOf[owner] = initialSupply;

        // Set the token name
        tokenName = _tokenName;

        // Set the token symbol
        tokenSymbol = _tokenSymbol;

    }

}
Create the Ability to Transfer Tokens
Lastly, we will create a function that allows us to transfer tokens from one address to another. We will require the balance of the sender to be at the very least - greater than or equal to the balance they are trying to send. We will then require the balance of the recipient plus the value they are to receive to be greater than or equal to their their current balance.
From there we will subtract the value from the senders address, and then add the value to the recipients address.
If all goes well we will return a boolean of true.
pragma solidity ^0.4.20;

contract BrooklynToken {

// Set the contract owner
    address public owner = msg.sender;

    // Initialize tokenName
    string public tokenName;

    // Initialize tokenSymbol
    string public tokenSymbol;

    // Create an array with all balances
    mapping (address => uint256) public balanceOf;

    // Initializes contract with initial supply tokens to the creator of the contract
    function BrooklynToken(uint256 initialSupply, string _tokenName, string _tokenSymbol) public {

        // Give the initial supply to the contract owner
        balanceOf[owner] = initialSupply;

        // Set the token name
        tokenName = _tokenName;

        // Set the token symbol
        tokenSymbol = _tokenSymbol;

    }

    // Enable ability to transfer tokens
    function transfer(address _to, uint256 _value) public returns (bool success) {

        // Check if the sender has enough
        require(balanceOf[msg.sender] >= _value);

        // Check for integer overflows
        require(balanceOf[_to] + _value >= balanceOf[_to]);

        // Subtract value from the sender
        balanceOf[msg.sender] -= _value;

        // Add value to recipient
        balanceOf[_to] += _value;

        // Return true if transfer is successful
        return true;

    }

}
7. Testing Our Deployment ✅
Now that we've created our contract we need to test whether or not it's working the way we hoped. Lucky for us, Remix is the perfect tool 🛠 for us to do this right from our browsers.
So from Remix we need to:
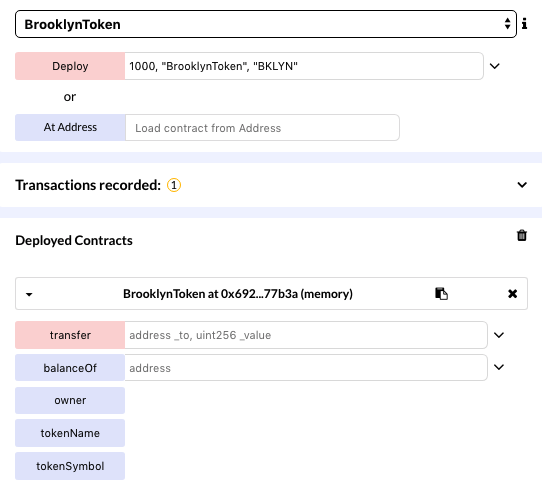
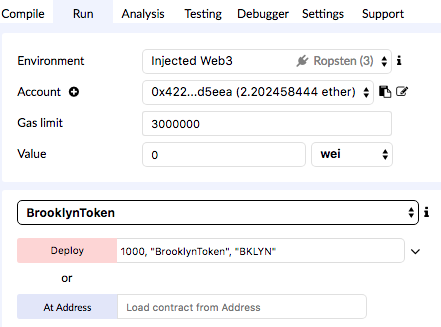
Deploy our Smart Contract
To do so, we need to pass in the initialSupply as an unsigned integer, the _tokenName as a string, and the _tokenSymbol as a string.
Here is an example:
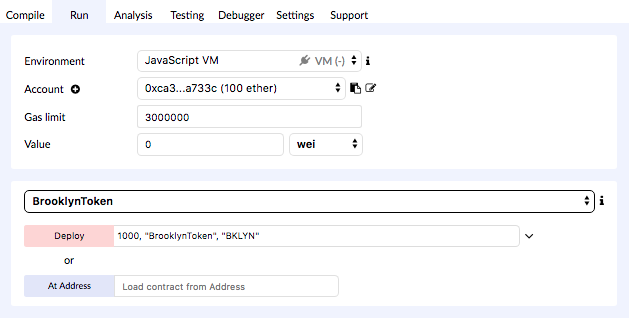
NOTE: Once you've filled in the initialSupply, _tokenName, and _tokenSymbol parameters - be sure to hit the red 'Deploy' button.
Test Functionality
Now that we've deployed our contract, we can test our smart contract to make sure everything is working acording to plan.
You will now see a 'Deployed Contracts' section that will contain the smart contract we just created.
Note: You may need to click the arrow on the left of the 'Deployed Contracts' section to get your contract to expand like the image below.
Verify the owner of the smart contract
We can verify the address of the owner of our smart contract simply by clicking the owner button. Remember that the owner is the initial address that deployed the contract.

Note: You will have the same addresses as the ones used in this example as they are the ones used in the Remix 'JavaScript VM' environment
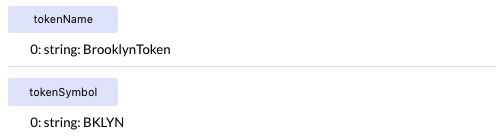
Verify the Token Name and the Token Symbol
The same way we viewed the owner of the smart contract, let's just make sure that the tokenName and tokenSymbol are exactly what we expect.
To do that, just click the purpley-blue tokenName and tokenSymbol buttons on our smart contract.
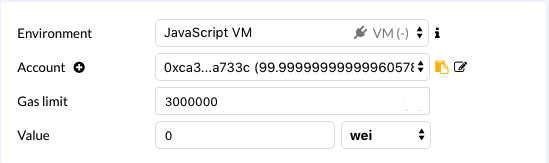
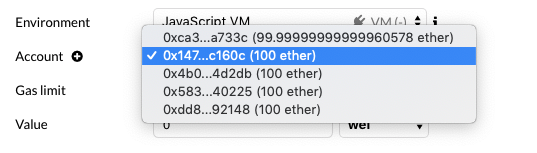
Go to the 'Account' section at the top and copy your account address
Copy the address of the first account in the accounts list by hitting the little clipboard to the right. Yes - you could've copied the address right from the owner field from one of the previous steps, but I wanted to point out that you can easily copy addresses from this section above.
Paste the address into the balanceOf field of our smart contract
Make sure to hit the balanceOf button after you've pasted in your address.
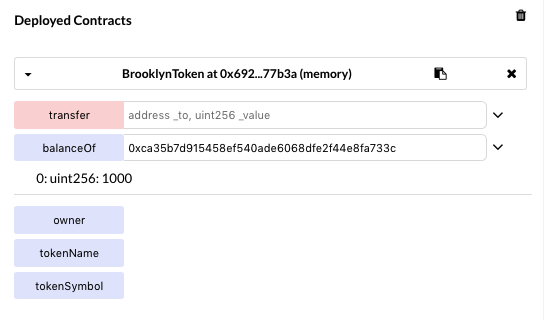
If all went well, you should see that this address holds 1000 tokens, because this was the address that deployed the contract, therefore it is the contract owner which recieved all of the initialSupply.
Transfer some tokens to another address
In the Remix 'Account' section, change the address to one of the other 4 account addresses in the drop down and make sure to copy the address by clicking on the little 📋 to the right ➡.
🚨 IMPORTANT: Make sure to switch back to the original, contract owning address 🚨
Once you've switched back to the owner address, go down to the smart contract and paste the other address that we just copied into the transfer field.
If you recall, we also need to specify a value, the amount of tokens, that we would like to transfer this address. Let's transfer the address 0x14723a09acff6d2a60dcdf7aa4aff308fddc160c an amount of 50 tokens. See the example below:

Don't forget to click the pinkish-red transfer button
Confirm the Transfer
If all went well, the address we just transferred the tokens to will reflect a new balanceOf 50 tokens.
Paste the address into the balanceOf field and click the button:

Awesome 👏👏👏👏👏
At this point, it's safe to say that our testing looks to be complete. Keep in mind that there's plenty of ways to test and secure your tokens in a much more robust fashion. For the sake of keeping this example simple, we will not get into that, but just know that this is to be considered a minimal viable token on the Ethereum blockchain.
Step 8. Switch to Ropsten Test Net
Congratulations - you're almost there. We are going to deploy our BrooklyToken to the Ethereum Ropsten blockchain which is a test network used for development purposes.
Switch Remix Environment to Ropsten Test Network
Switch the Remix IDE environment from 'JavaScript VM' to 'Ropsten Test Network'.
Open MetaMask Chrome Extension
Make sure MetaMask is still set to the 'Ropsten Test Network' and that you have at least a little bit of Ether in the account. If not, refer back to Step 3 of this tutorial.
Step 9. Deploy Smart Contract to Blockchain 🚀
In Remix, Deploy the Smart Contract
Now that we've switched to the Ropsten Test Network, we will now need to deploy our Smart Contract once again. The difference, this time, being that this is to an actual blockchain instead of a virtual environment like Javascript VM which only exists within our browser.
Deploy our contract in the same way we did for the 'JavaScript VM' environment:
From there, you will notice that MetaMask pops up asking to confirm (or reject) the contract deployment, giving you details of gas fees and the data the contract contains. Click 'confirm' ✅.
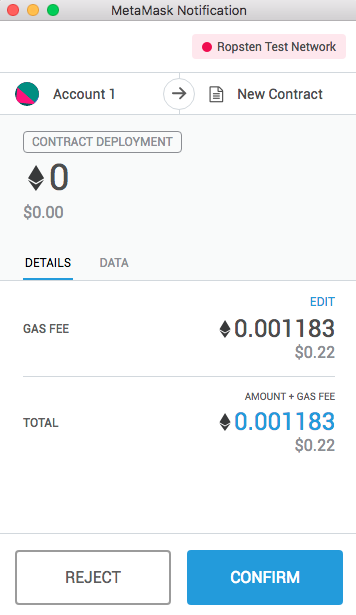
Note: Now that we're deploying to a real (test) blockchain, things are not instant - this can take 30-45 seconds
Awesome - you should see in the MetaMask extension that your contract deployment was confirmed!
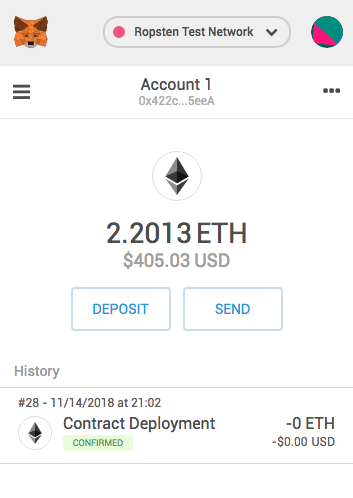
Step 10. View Your Token on Etherscan 👀
Lastly, expand the contract details from within MetaMask and click the button that says 'View on Etherscan':
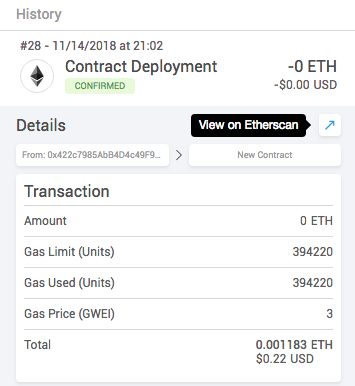
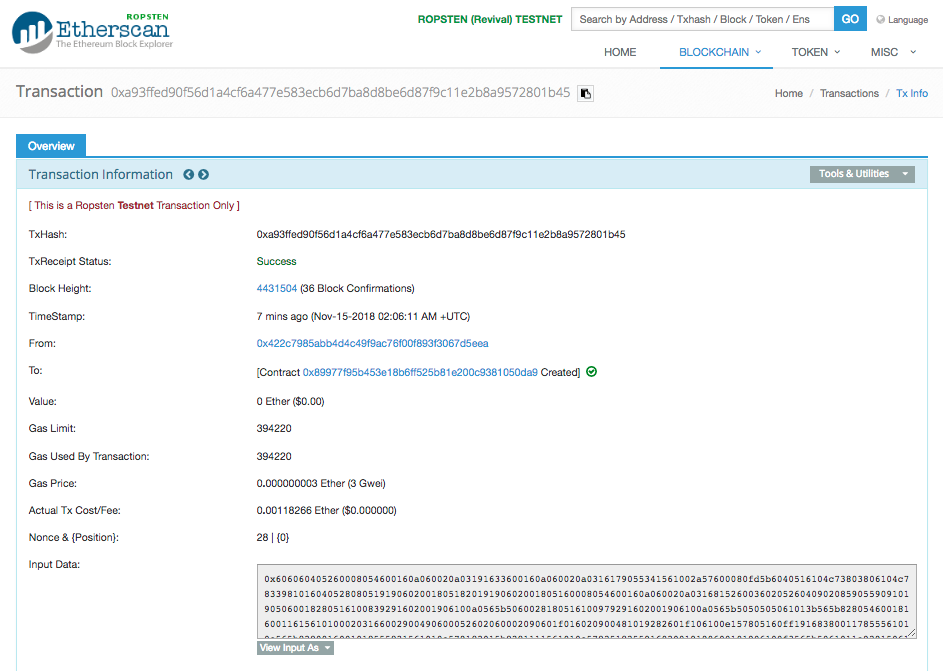
From Etherscan.io you will than be able to view the details of your transaction like so:
Source Code
// Set the solidity compiler version
pragma solidity ^0.4.20;

contract BrooklynToken {

    // Set the contract owner
    address public owner = msg.sender;

    // Initialize tokenName
    string public tokenName;

    // Initialize tokenSymbol
    string public tokenSymbol;

    // Create an array with all balances
    mapping (address => uint256) public balanceOf;

    // Initializes contract with initial supply tokens to the creator of the contract
    function BrooklynToken(uint256 initialSupply, string _tokenName, string _tokenSymbol) public {

        // Give the initial supply to the contract owner
        balanceOf[owner] = initialSupply;

        // Set the token name
        tokenName = _tokenName;

        // Set the token symbol
        tokenSymbol = _tokenSymbol;

    }

    // Enable ability to transfer tokens
    function transfer(address _to, uint256 _value) public returns (bool success) {

        // Check if the sender has enough
        require(balanceOf[msg.sender] >= _value);

        // Check for integer overflows
        require(balanceOf[_to] + _value >= balanceOf[_to]);

        // Subtract value from the sender
        balanceOf[msg.sender] -= _value;

        // Add value to recipient
        balanceOf[_to] += _value;

        // Return true if transfer is successful
        return true;

    }
}
Congratulations! 🎉🎈🔥█⛓
You've just minted your first cryptocurrency!
And that's really all there is to it. There's definitely a lot of features that would need to be implemented in order to make this coin worthy of an ICO, but you're well on your way to your first billion.
Check out the full ERC20 Token spec to get a better idea of what a truly secure and robust coin will need.
Feel free to send over some of those sweet sweet BrooklynTokens to 0x12cC9AcF2cBfEFa72F73D1FddC104451D94160cB 😏.
Shoot me an email at [email protected] with any questions and if you enjoyed this, stay tuned and subscribe below! 👇
Help us improve our content