OpenAI Chat API Tutorial
Build a simple chatbot using the OpenAI Chat API. Make a portfolio-worthy project using the same AI language models as ChatGPT!
OpenAI has taken the world by storm with their flagship AI chatbot, ChatGPT, which uses a robust suite of AI language models. Within 2 months of it's launch, ChatGPT eclipsed 100M monthly active users, making it the fastest growing consumer application of all-time.
Tens of thousands of people have been building apps using the same (or similar) APIs as ChatGPT, coming up with some really interesting products such as chatbots, content writing tools, and more.
Let's learn how to work with the OpenAI Chat API by building a small project of our own.
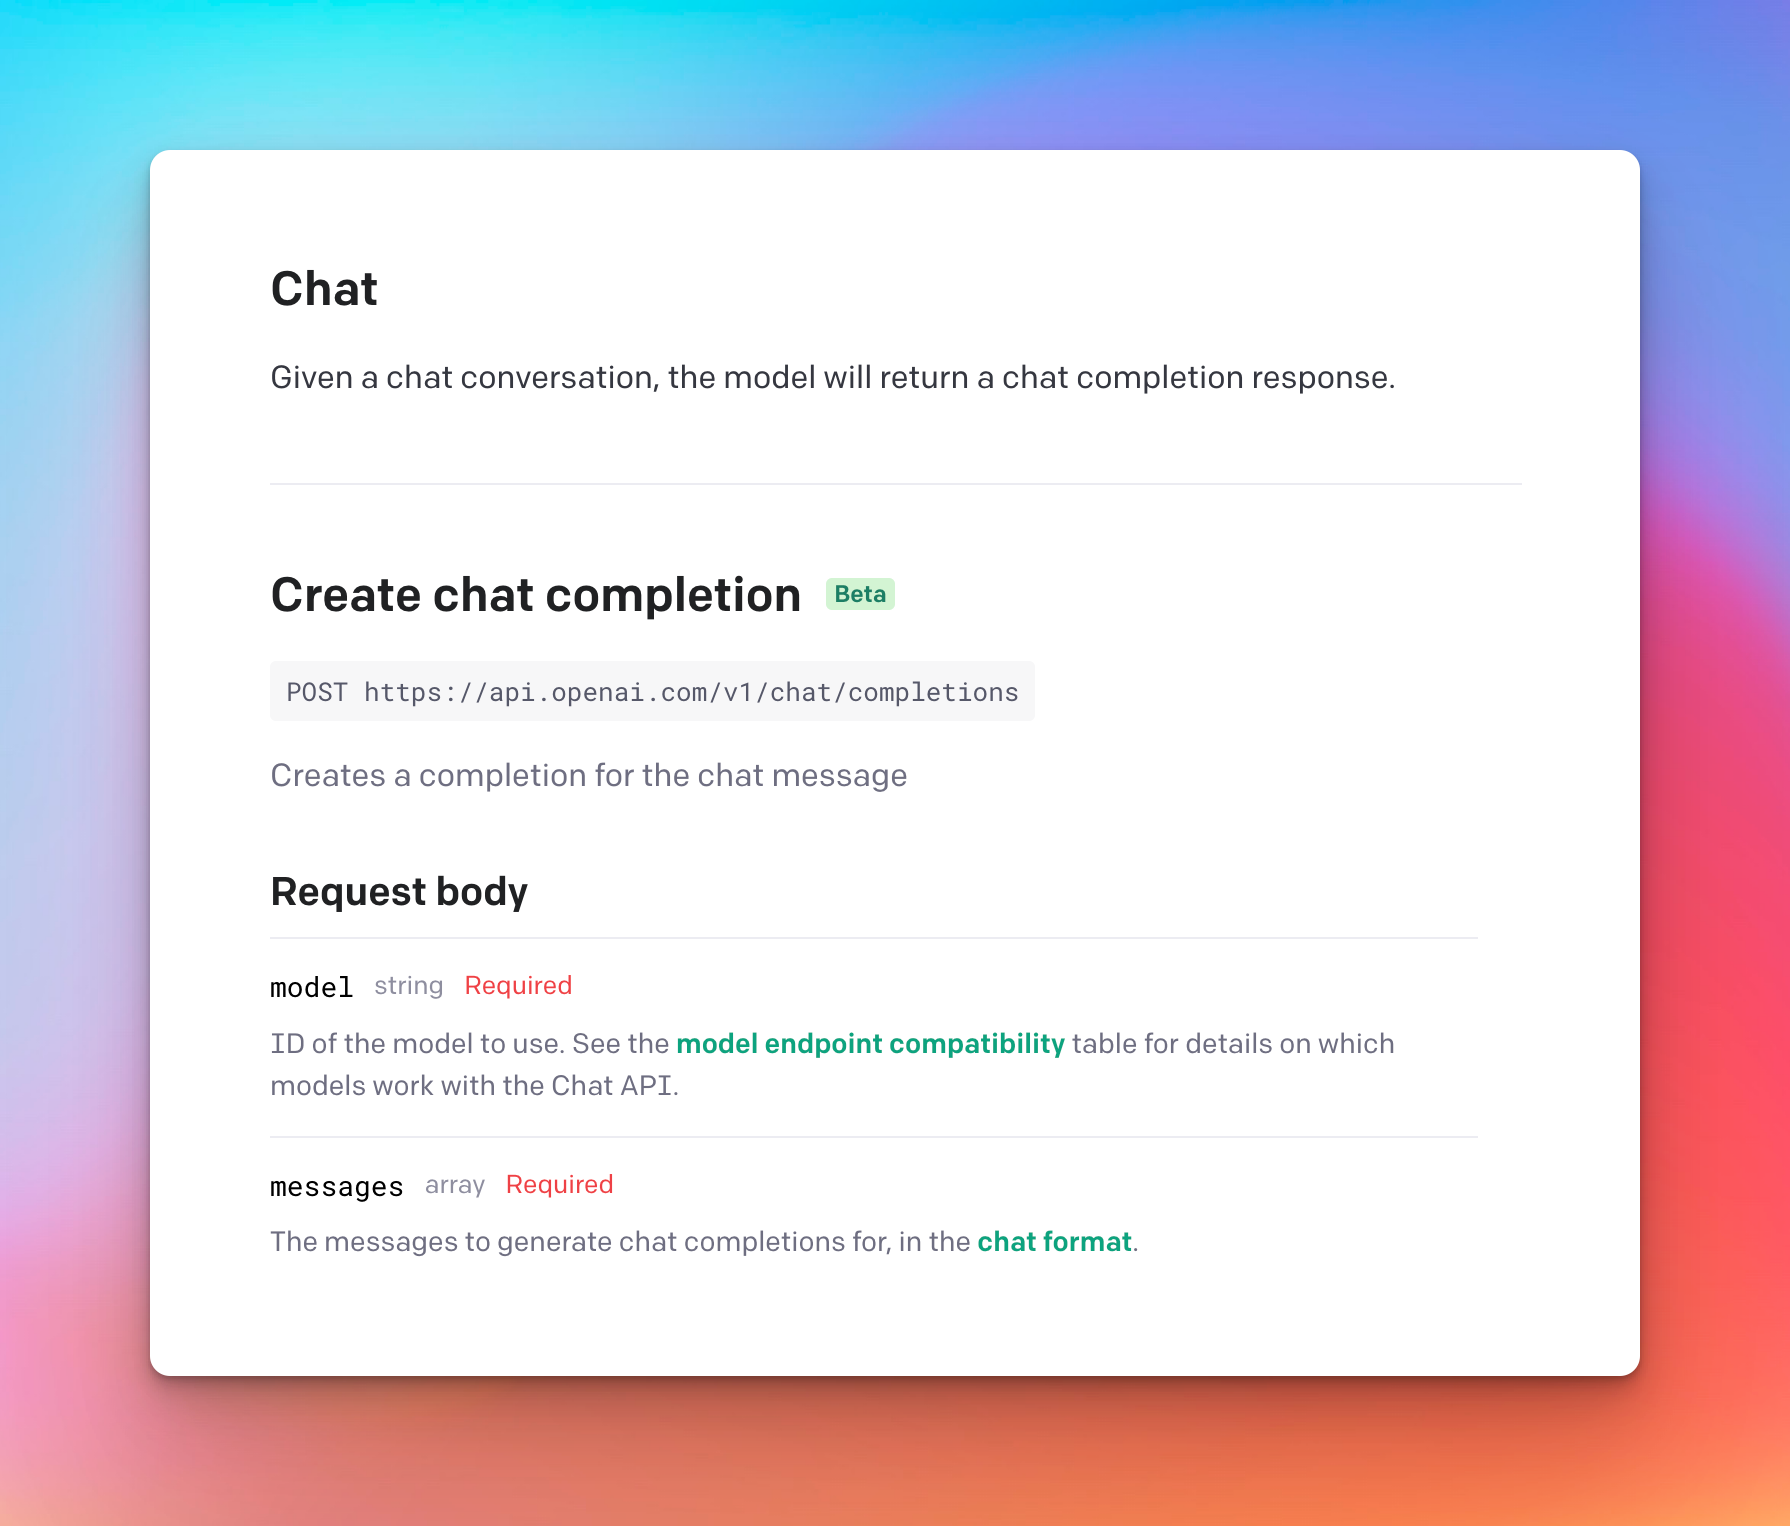
The API
To use the OpenAI Chat API, simply specify the model and provide a messages array. Other parameters can be used for fine-tuning, but we won't get focus on that for now. The API returns a response based on the context of the messages array provided.
For the model, we'll be making use of the GPT-4 language model (gpt-4 , which according to OpenAI, is their most capable and optimized model, which just so happens to be the same model used by ChatGPT itself.
gpt-4 model is currently in a limited beta, but other models, such as gpt-3.5-turbo, are publicly available. View all available models here: https://platform.openai.com/docs/modelsIt's worth noting that there are a handful of other OpenAI models we could use when working with this API, each of which have their own set of tradeoffs. It's worth checking out the docs on the various models that are available here.
API Docs


The Project
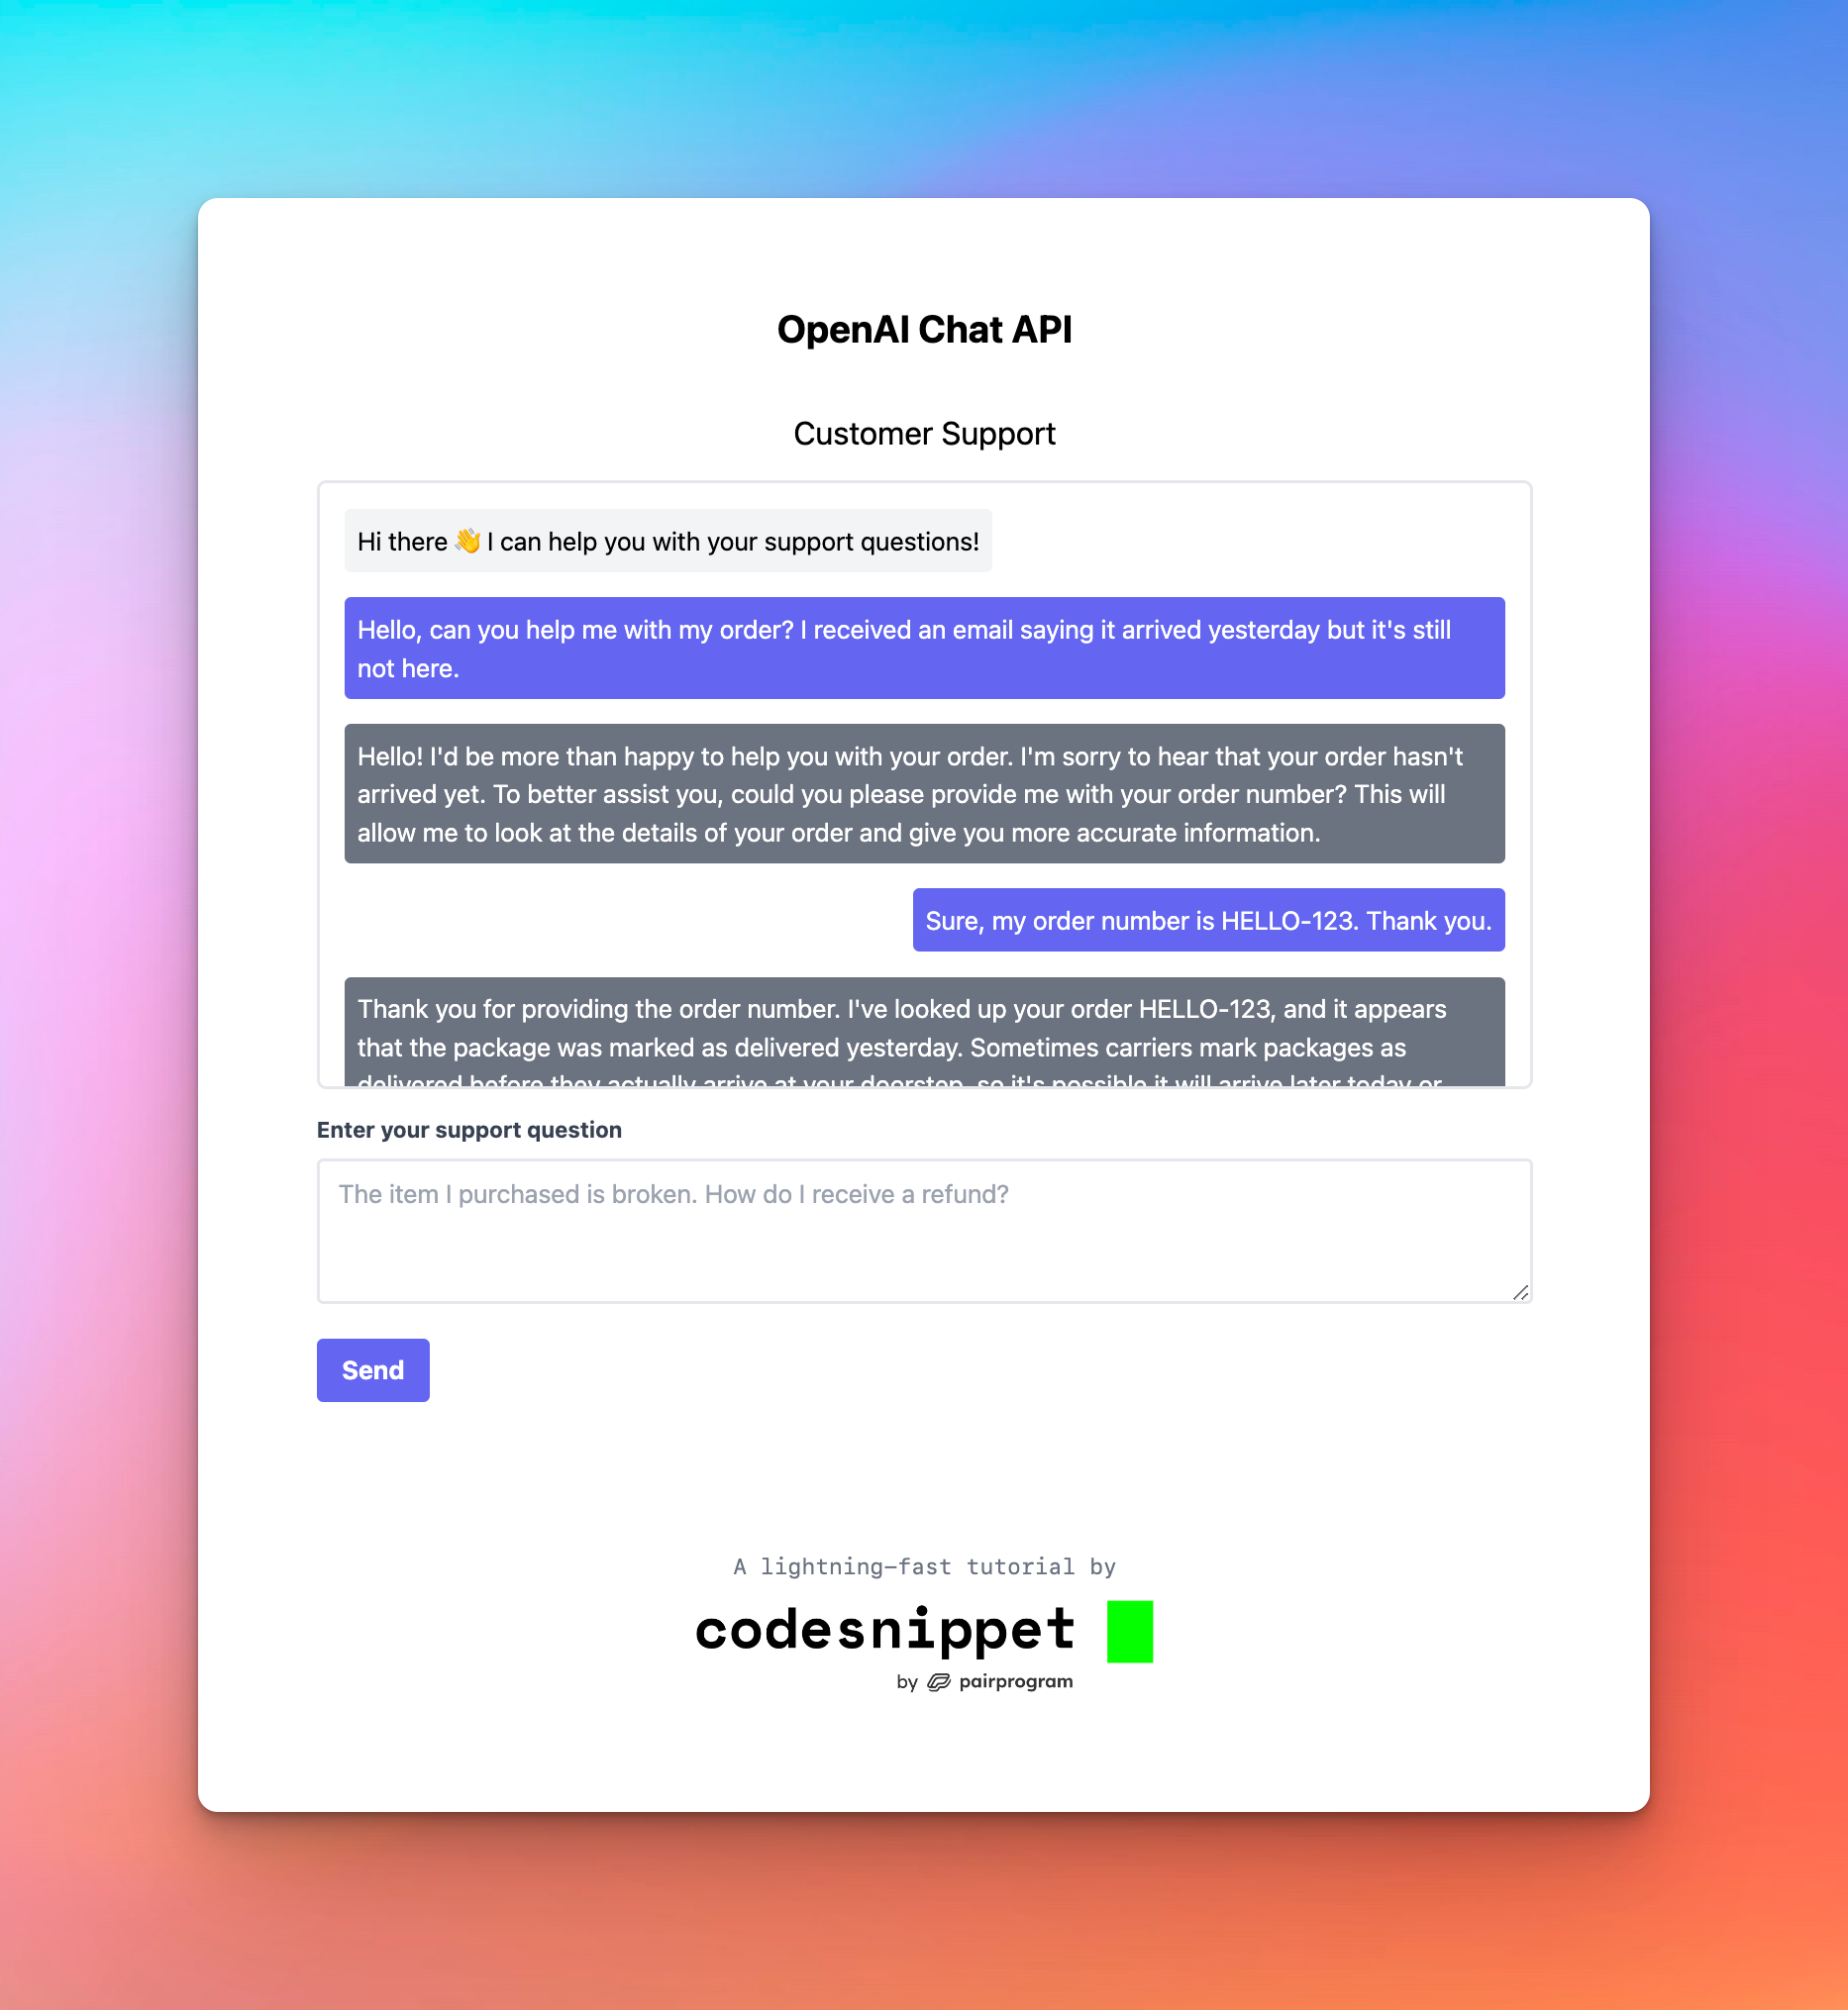
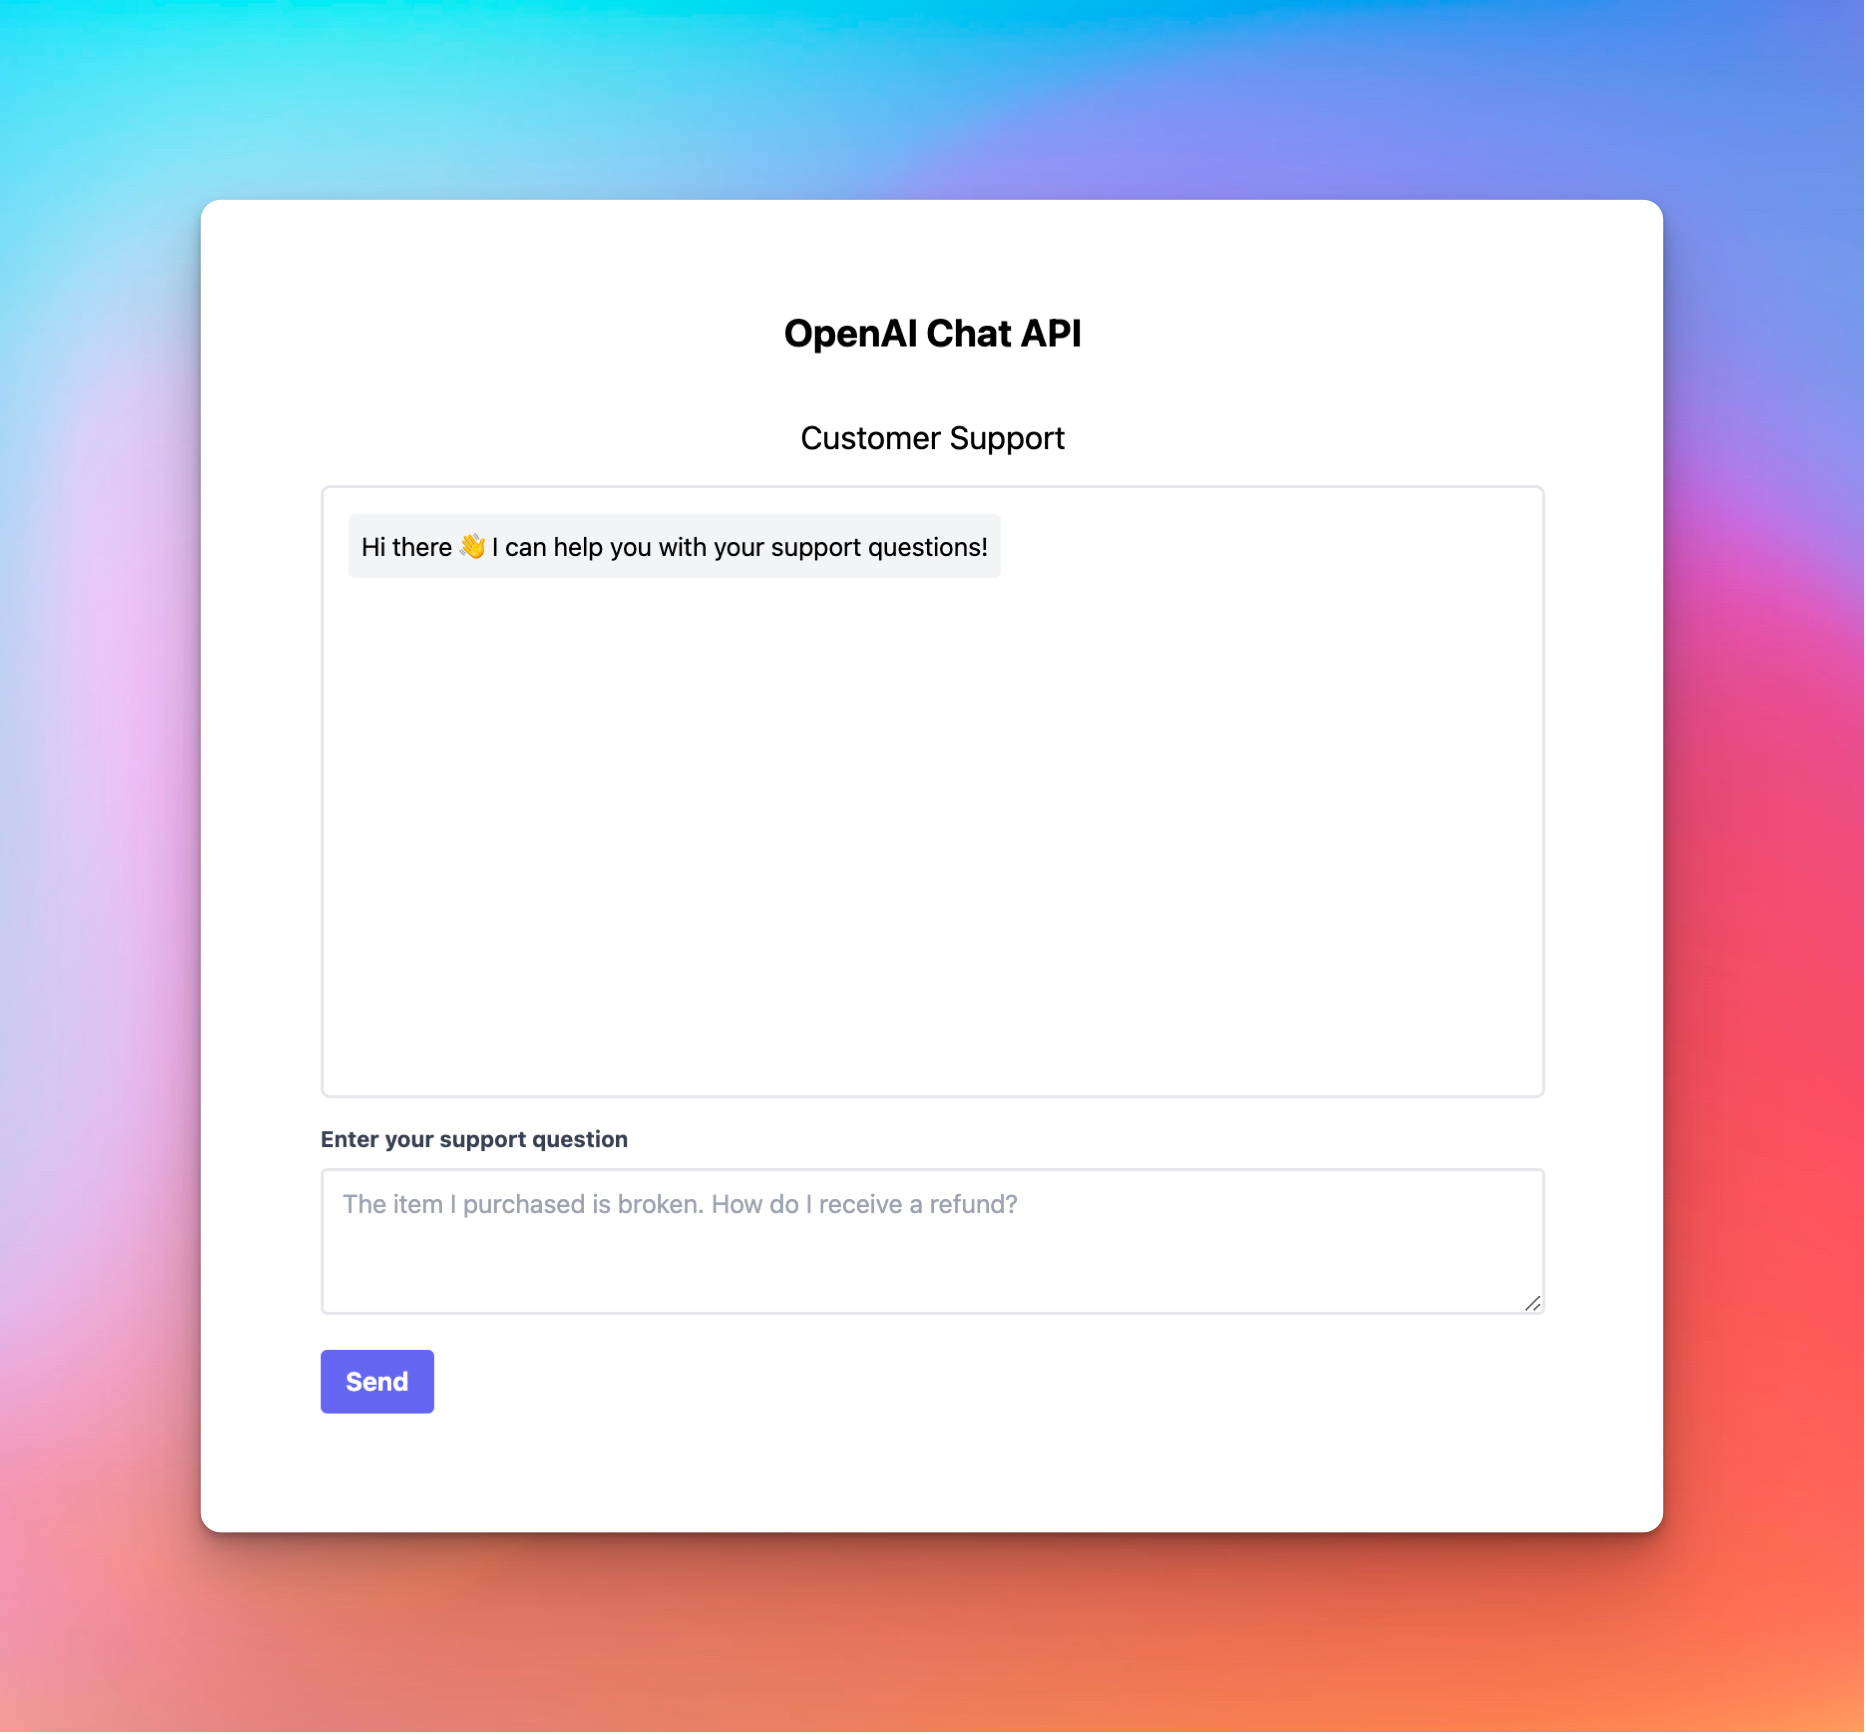
We'll be building a simple customer support chatbot that leverages the OpenAI Chat API (and the gpt-4 natural language AI model) to respond to various support questions and prompts from customers.
It will have a simple chat dialogue where a user can enter a question, and then the chatbot will reply. The chatbot's reply will ultimately come from the OpenAI Chat API!
Requirements
Looking at the screenshot of our simple project above, it appears we have a few basic functional requirements. Our project will need to:
- Capture the user's input when they enter a question into the text input and click "Send"
- Send the user's question to our server, which then subsequently passes the request to the OpenAI API (the brains behind our chatbot)
- Display the user's question in the chat history
- Display the chatbot's response to the user's prompt in the chat history
We also have a few non-functional, less-obvious, technical requirements. They're not necessary per se, but they're considered to be software engineering best-practices and conventions.
- Our client (frontend) should be separate from our server (backend)
Again, not necessary, but it's generally a good idea to keep frontends and backends separate so that they're not tightly coupled, can be worked on by separate teams, and overall development speed is usually faster as a result. The project template is already configured this way – containing both client/ and server/ directories that contain their respective code.
In the "real world", the tradeoff here is that there's typically more overhead when it comes to deploying separate artifacts (those artifacts being the frontend code and the backend code), but in our case, we won't have to worry much about that since we're developing our project locally and not deploying it – for now at least.
- API requests to OpenAI should be proxied through our server
Essentially we should not send an API request to OpenAI's servers directly from our client/frontend. In the event that OpenAI's Chat API endpoint ever changes, it could break our application and cause us to rewrite a large part of our frontend to accommodate for said changes. Instead, we should send a request to our own server endpoint, which in turn, sends a request to OpenAI's servers under the hood, parses the response as needed, and returns the data in a format that we control. The difference is nuanced but it helps us control the "contract" between both the frontend and the backend, as opposed to leaving that up to a third-party. Additionally, sending requests directly to a third-party API from the frontend could expose API keys among other things.
- Our application should be configurable
This could mean many things to many people. In our case, we want to make sure that, through a configuration file such as a .env, we can configure our application so that we do not expose secrets, API keys, or other sensitive data in our source code, and that these environment variables can change as needed depending upon the environment in which our code is running (think your local machine vs. development servers vs. production servers). The good news is that things are already setup this way in our project template.
Getting Started
Let's start by cloning the basic CodeSnippet.io Project Template here:
Next, let's open up the project template in our code editor of choice.
The rest of the instructions are in the Getting Started section of the README.md, but we essentially just need to:
1. Setup the .env file
- This can be done manually from a code editor
- Or from a terminal, in the root of the project run
cp .env.example .env - Make sure to paste any contents of
.env.exampleinto.env - This project requires an environment variable named
OPENAI_API_KEY, so to start, add it to the.envwith a blank value for now. Example:OPENAI_API_KEY=
2. Generate a new OpenAI API key
- Login or create an account here.
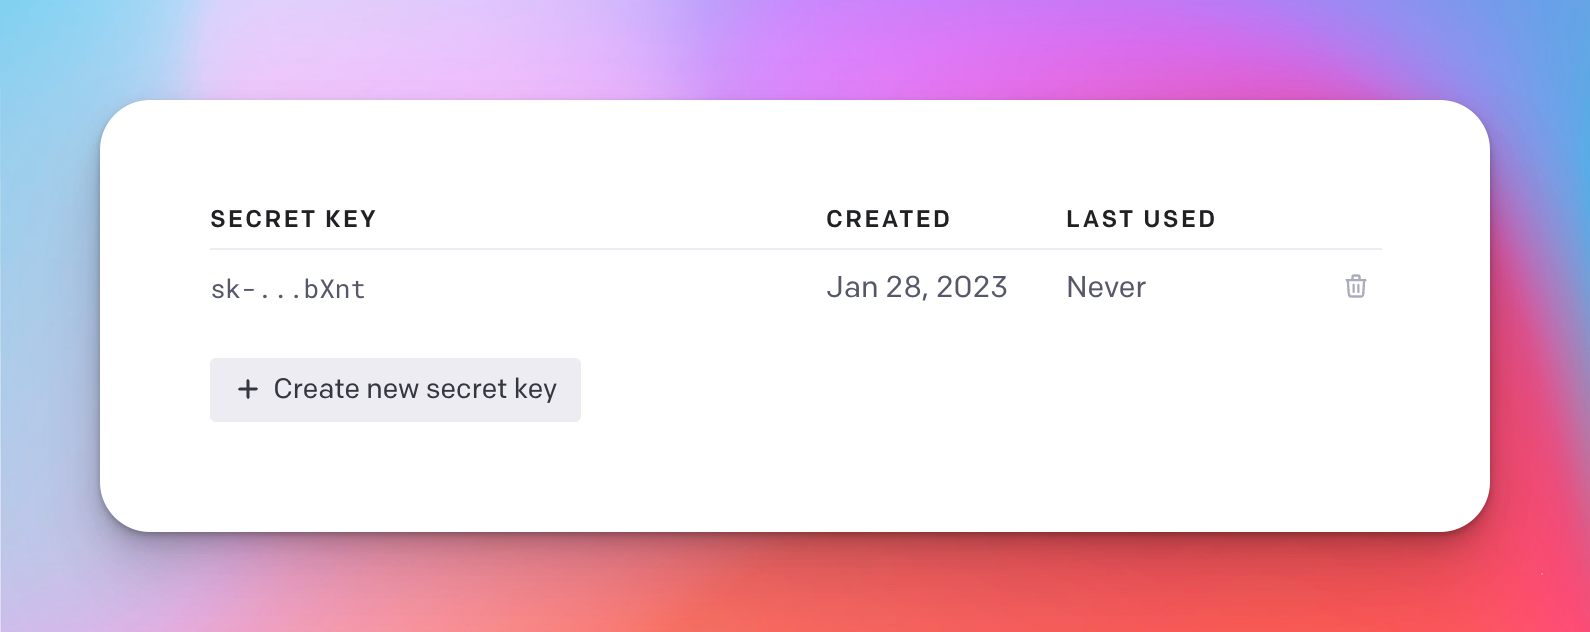
- Go here to generate a new API key by clicking on the "Create a new secret key" button
- Copy the API/secret key
- Paste the value into the
.envfile next to theOPENAI_API_KEY, for example:OPENAI_API_KEY=PASTE_YOUR_KEY_HERE
3. Install the project dependencies
- From a terminal run
npm install
4. Start the development server
- From a terminal run
npm run dev
5. Open project in browser
- From a web browser, open
localhost:3000to view the template project that we will build our project from
Setting up the backend
Whether we start on the backend or frontend doesn't entirely matter, but since the backend of our application is fairly simple we can start there.
In the server/main.js file, locate this code snippet (heh) below and delete it:
app.post('/api/hello', async (req, res) => {
    const { name } = req.body;
    res.json({ data: `Hello, ${name}` });
});We're ultimately going to create an abstraction on top of the OpenAI Chat API, parse the response as needed per the requirements, then pass it back to the frontend of our app to display it to the user.
One of our non-functional requirements is that:
API requests to OpenAI should be proxied through our server
Simply put, this means we want our frontend to make an API request to our backend, and then our backend makes an API request to OpenAI under the hood.
Frontend -> Backend -> OpenAI Chat API
In place of the code we just deleted, let's add this new snippet below:
// define a list of messages to be used as context for the chat
// using the global scope that way it can be used elsewhere on the server, if needed
// (this use of `global` shouldn't be done in a "real" app)
global.messages = [
    {
        role: "system",
        content: "You are a helpful, empathetic, and friendly customer support specialist. You are here to help customers with their orders. You sometimes make small talk."
    },
    {
        role: "system",
        content: "Additionally, you never ask the customer to upload or provide any photos as our website has no means of doing so at this time. Also, do not mention that you are a bot."
    },
];


// our route `/api/openai` is arbitrary
// but it's generally a convention to prefix routes with `/api`
// followed by a descriptive resource name, in our case `/openai`

// note that this is an HTTP POST request as denoted by `app.post`
app.post('/api/openai', async (req, res) => {
	// additionally, as convention with express.js applications,
    // a callback is invoked when a resource is requested
    // and it receives a request (req) and a response (res)

	// business logic goes here
    // ...
});
Notice how we added a global.messages array, with a couple "chat" objects? We'll talk more about the chat objects in a second, but essentially we will use global.messages as a way to persist our conversation with the bot as we go.
This isn't something we'd want to do in a "real" app or production environment, but for the sake of keeping this tutorial lightweight, it will do the trick.
With every request to the OpenAI Chat API, we will pass in the global.messages array that contains all of the previous user and assistant messages, adding to array as the conversation progresses. This allows for the bot to always have the full context of the conversation.
For example, if we were to ask it something like:
"Who won Super Bowl LI?"
The bot would then respond with:
"The New England Patriots won Super Bowl LI, beating the Atlanta Falcons 32-28 in OT"
But then if you were to ask:
"What was the score at halftime?"
Without the context / previous chat history, the bot wouldn't know how to answer that. This is why persisting the chat history is important!
Alright, let's keep moving!
We know we will be sending the user's message to our server, so in the HTTP POST request body, let's decide on what that payload should look like.
I'm thinking a simple JSON object with a message key would work as our request body.
{
    "message": "Hello, I noticed my order is running late. Can you check on that for me?"
}Now that we know the "contract" of the payload being sent from the frontend to the backend, we can write our code around that.
app.post('/api/openai', async (req, res) => {
    // get the `message` from the request body
    const { message } = req.body;
});message from our request body payloadBefore we write the code to send our request to OpenAI's API from our server, let's have a quick look at the entire request payload:
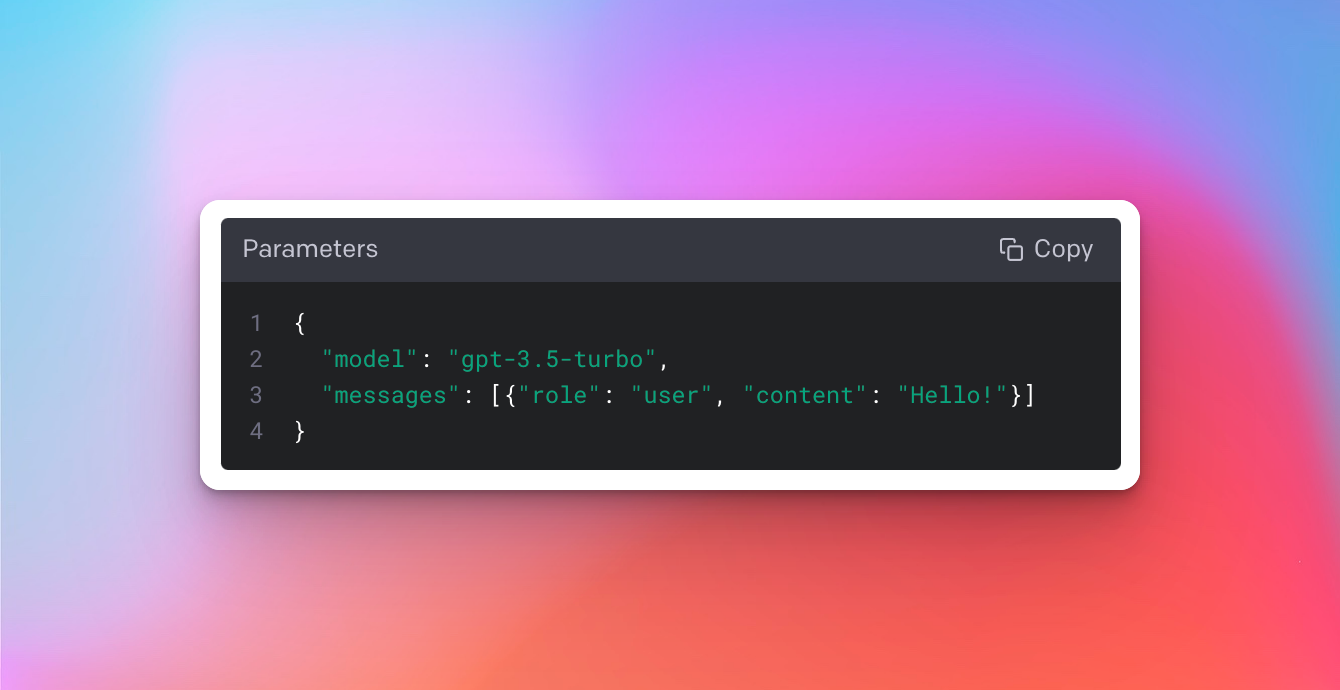
It's important to call out the "shape" of the objects being passed to the messages array. Essentially it's a simple object with a role key, which can be one of three values – system, user, or assistant, and a content key which is the chat message.
// a system message helps to set the behavior of the assistant
{ "role": "system", "content": "You are a helpful support specialist." }

// a user message helps to instruct the assistant
{ "role": "user", "content": "Hello there, can you check on my order?" }

// an "assistant" message is what's returned,
// and used when providing the overall context of the conversation
// when it's passed into the `messages` array in the request
{ "role": "assistant", "content": "Sure thing! May I have your name?" }
Read more about the "chat" format here 👇 https://platform.openai.com/docs/guides/chat/introduction
Next, we can take the user's message and send that over to the OpenAI Chat endpoint:
app.post('/api/openai', async (req, res) => {
    const { message } = req.body;

    // store user message in global message state
    const userMessage = { role: "user", content: message };

    // add to global messages list
    global.messages.push(userMessage);

    // send a request to the OpenAI API with the user's message
    // using the node-fetch library
    const response = await fetch('https://api.openai.com/v1/chat/completions', {
        method: 'POST',
        headers: {
            // notice how we're using process.env here
            // this is using the environment variable from the .env file
            'Authorization': `Bearer ${process.env.OPENAI_API_KEY}`,
            'Content-Type': 'application/json',
        },
        // construct the request payload
        // using the entire chat history (global.messages)
        // sending an external request to the OpenAI API
        body: JSON.stringify({
            model: 'gpt-4',
            messages: global.messages,
			// the maximum number of tokens/words the bot should return
            // in response to a given prompt
            max_tokens: 100,
        }),
    });

    if (!response.ok) {
        // if the request was not successful, parse the error
        const error = await response.json();

        // log the error for debugging purposes
        console.error('OpenAI API Error:', error);

        // return an error response to the client
        return res.json({ status: 'error', data: null });
    }

    // parse the response from OpenAI as json
    const data = await response.json();

    // get the bot's answer from the OpenAI API response
    const botAnswer = data?.choices?.[0]?.message?.content

    // create the bot message object
    const botMessage = { role: "assistant", content: botAnswer };

    // store bot message in global message state
    global.messages.push(botMessage);

    // send the bot's answer back to the client
    return res.json({ status: 'success', data: botAnswer });
});
Let's also take a quick look at the response payload, since in the above code snippet we're just "randomly" using data?.choices?.[0]?.message?.content but I haven't exactly explained why yet.
Here's the entire response payload from the OpenAI Chat API endpoint:
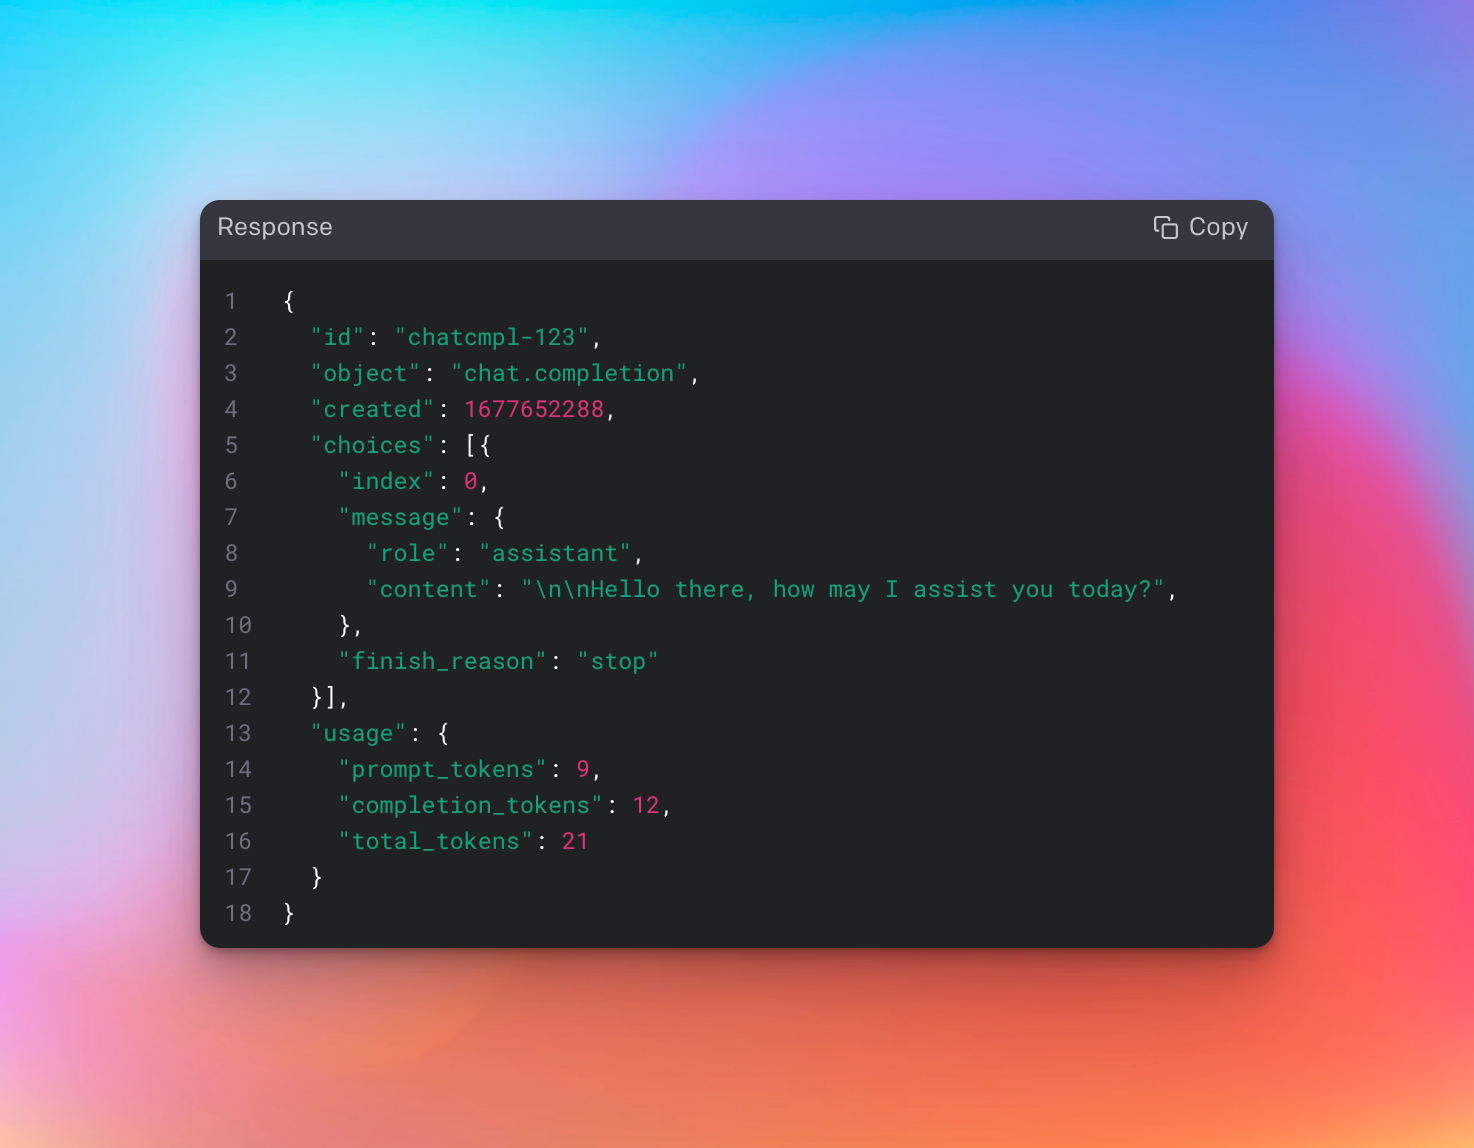
So when we're accessing data?.choices?.[0]?.message?.content, that would evaluate to \n\nHello there, how may I assist you today? in the screenshot above. For our purposes, we'll generally want the first "choice" that's returned to us from the OpenAI Chat API, so data?.choices?.[0]?.message?.content makes sense here.
At this point our backend server is good to go!
Setting up the frontend
Next up is the frontend. Let's start by adding the HTML for our app. Since the HTML itself isn't the primary focus of this tutorial, we will copy & paste the markup into our project.
First, from the client/index.html file, locate the opening and closing <main> tags, then delete them and all of the content within them.
Next, paste this HTML into the client/index.html where the previous <main> tags just were:
<main class="grow flex flex-col items-center justify-center">
    <h1 class="text-center text-2xl mt-5 font-bold my-4">OpenAI Chat API</h1>
    <h2 class="text-center text-xl mt-5 my-4">Customer Support</h2>
    <section class="dialogue-section w-full max-w-3xl border-2 border-gray-200 rounded-md p-4 h-96 overflow-scroll">
        <ul id="dialogue" class="flex flex-col space-y-4">
            <li class="bg-gray-100 rounded p-2 w-fit self-start break-words">
                    Hi there 👋 I can help you with your support questions!
            </li>
        </ul>
    </section>
    <section class="prompt-section my-4 w-full max-w-3xl">
        <div class="prompt-input-section flex flex-col">
            <form id="prompt-form">
                <label for="prompt-input" class="block text-gray-700 text-sm font-bold mb-2">Enter your support
                    question</label>
                <textarea
                          id="prompt-input"
                          name="prompt"
                          cols="38"
                          rows="3"
                          placeholder="The item I purchased is broken. How do I receive a refund?"
                          class="appearance-none border-2 border-gray-200 rounded w-full py-2 px-3 text-gray-700"
                          ></textarea>
                <button type="submit"
                        class="my-4 bg-indigo-500 hover:bg-indigo-700 text-white font-bold py-2 px-4 rounded">
                    Send
                </button>
            </form>
        </div>
    </section>
</main>
Although we're copy and pasting the above, I still encourage you to scan through the HTML we just added to try and get a better idea of what going on with it.
Afterwards, open up localhost:3000 in your browser and you should see the basic frontend of our app.
Let's wire things up
Functional Requirement #1: Capture the user's input when they enter a question into the text input and click "Send"
With the requirement we're dealing with input from the user. For the sake of simplicity we will forgo most of the input validation and sanitization we'd normally employ on a production app.
Looking at our HTML that we copy pasta'd into the client/index.html file, we can see the user input field here:
...
<form id="prompt-form">
    <label for="prompt-input" class="block text-gray-700 text-sm font-bold mb-2">Enter your support
        question</label>
    <textarea
              id="prompt-input"
              name="prompt"
              cols="38"
              rows="3"
              placeholder="The item I purchased is broken. How do I receive a refund?"
              class="appearance-none border-2 border-gray-200 rounded w-full py-2 px-3 text-gray-700"
              ></textarea>
    <button type="submit"
            class="my-4 bg-indigo-500 hover:bg-indigo-700 text-white font-bold py-2 px-4 rounded">
        Send
    </button>
</form>
...
It's a simple HTML form that contains a textarea input field, which are typically used for long-form inputs, such as a customer support question.
Adding the client-side logic
Let's first start by deleting the existing contents of the client/app/index.js file. I'll also add a big red callout below so you don't forget.
client/app/index.js What we ultimately want to do is, when the user clicks the "Send" button, take whatever text has been inputted into the textarea and send it to our server.
We can do that by adding some basic JavaScript like so to the client/app/index.js file.
// when the window loads, attach an event listener to the form
// that fires when the 'send' button is clicked
window.onload = () => document.getElementById('prompt-form').addEventListener('submit', (e) => {
    // prevent the form from refreshing the page
    e.preventDefault();

    // get the value of the input
    const message = document.getElementById('prompt-input').value;

    // call the function that handles the fetch request
    // (we'll create this function next)
    handleSubmitMessage(message).then((data) => {
        // add the chatbot's response to the DOM
        // when the fetch request is complete
        // (we'll create this function later)
		addBotMessageToDialogueBox(data);
    });
});The code above:
- waits until the browser has loaded all of the markup/structure of the page (HTML)
- attaches a 'submit' event listener to the
formthat waits for the "Send" button to be clicked. - when 'Send' is clicked, it grabs the text from the user input
textarea - then passes the user's input to
handleSubmitMessage(we'll work on this part next)
Functional Requirement #2: Send the user's question to our server, which then subsequently passes the request to the OpenAI API (the brains behind our chatbot)
Next up, we will take the user's prompt and pass that along to our backend server (that we will build shortly).
In the previous requirement, we were able to extract the user's prompt from the textarea using this code:
const question = document.getElementById('prompt-input').value;
Then we passed it to some other function that doesn't exist (yet) – handleSubmitMessage.
Our job now is to implement handleSubmitMessage. Add this to client/app/index.js as well:
// function accepts the user `message` as an input
async function handleSubmitMessage(message) {
    // input validation
    if (!message) {
        return alert('Please enter your support question');
    }

    // add the user's message to the DOM
    // (we'll implement this later)
	addUserMessageToDialogueBox(message);

    // send fetch request to our backend api
    const response = await fetch('/api/openai', {
        method: 'POST',
        headers: {
            'Content-Type': 'application/json',
        },
        body: JSON.stringify({ message }),
    });

    // parse our server's response as json
    const payload = await response.json();

    // return the response
    return payload
}Functional Requirement #3: Display the user's question in the chat history
Next up, we'll want to make sure that the user's question is added to the chat dialogue, so we can implement the function addUserMessageToDialogueBox.
Yep, you guessed it. Add this to client/app/index.js too.
// accept the user's message as a function input
function addUserMessageToDialogueBox(message) {
    // create a new li element
	const userMessage = document.createElement('li');

    // add user-specific styling to element
    // so that it's obvious this is the user's prompt
    // and not a response from the chatbot
    userMessage.classList.add('bg-indigo-500', 'text-white', 'rounded', 'p-2', 'w-fit', 'self-end', 'break-words');

    // add the user's message to the li element
    userMessage.innerText = message;

    // add the li element to the DOM
    document.getElementById('dialogue').appendChild(userMessage);

    // clear the input for the next question
    document.getElementById('prompt-input').value = '';

    // display loading indicator in dialogue box
    addLoadingIndicatorToDialogueBox();
}Let's also create the addLoadingIndicatorToDialogueBox() function, which displays a nice loading indicator to the user while they're waiting for the API to return it's response.
function addLoadingIndicatorToDialogueBox() {
    // create a new li element
    const loadingIndicator = document.createElement('li');

    // set the id of the loading indicator
    loadingIndicator.id = 'loading-indicator';

    // add loading indicator styling
    loadingIndicator.classList.add('bg-gray-500', 'text-white', 'rounded', 'p-2', 'w-fit', 'self-start', 'w-12');

    // create a new image element
    const loadingImage = document.createElement('img');

    // set the image source
    loadingImage.src = '../images/loading.svg';

    // add loading indicator image as a child to li element
    loadingIndicator.appendChild(loadingImage);

    // add the li element to the DOM
    document.getElementById('dialogue').appendChild(loadingIndicator);
}
Functional Requirement #4: Display the chatbot's response to the user's prompt in the chat history
So now that we've wired up ways to capture the user's input, send the API request to our backend server with the user's question, and display the user's question in the chat dialogue, the only thing left is to display the chatbot's response.
In our functional requirement #1, we had a function (addBotMessageToDialogueBox) that's called after the call to handleSubmitMessage successfully resolves.
Ultimately we're taking the return value from handleSubmitMessage, which is the chatbot's response, and passing it to addBotMessageToDialogueBox which, in turn, adds the chatbot's response to the dialogue box.
Let's write the logic for that function. The good news is that it's very similar to the logic we already wrote for addUserMessageToDialogueBox.
Same thing for this last one, add it to client/app/index.js:
function addBotMessageToDialogueBox(response) {
	// remove the loading indicator now that the response has been received
    	removeLoadingIndicatorFromDialogueBox();

    // create a new li element
    const botMessage = document.createElement('li');

    // style the bot response element based on the status
    if (response.status === "error") {
        // add error styling
        botMessage.classList.add('bg-red-500', 'text-white', 'rounded', 'p-2', 'w-fit', 'self-start');

        // add error text
        botMessage.innerText = "Oh no! Something went wrong. Please try again later.";
    } else {
        // add user-specific styling to element
        botMessage.classList.add('bg-gray-500', 'text-white', 'rounded', 'p-2', 'w-fit', 'self-start');

        // add the user's response to the element
        botMessage.innerText = response.data.trim();
    }

    // add the li element to the DOM
    document.getElementById('dialogue').appendChild(botMessage);

    // clear the input for the next response
    document.getElementById('prompt-input').value = '';
}Similar to how we adding the loading indicator, we also want to wire up the functionality for removeLoadingIndicatorFromDialogueBox(), which will be called just before we add the bot's response to the chat dialogue.
function removeLoadingIndicatorFromDialogueBox() {
    // get the loading indicator element
    const loadingIndicator = document.getElementById('loading-indicator');

    // remove the loading indicator from the DOM
    loadingIndicator.remove();
}
Trying it out
At this point, our project should be ready to go. If you haven't been viewing the project in your browser as we've been adding code, make sure to open up http://localhost:3000 in a browser to check out the sweet app we just built using the OpenAI Chat API!
Check out the demo video 👇
Wrapping up
Hopefully this project was a quick, hands-on intro to using the OpenAI Chat API where you were able to build something kinda cool and somewhat practical.
Don't forget to snag the source code for this project 👇
I'd love to hear your feedback on how to make these quick, project-based API tutorials better. Share your thoughts and suggestions below!
Help us improve our content